Wednesday 26 December 2018

Scripting : An Easy way to use Law of Attraction | Write down your Manifestations! #3


We all have imagined our future and played make-believe games at a point of our life. We used to get excited when we imagined our dreams coming true. But soon you get your feet onto the ground and realise that simply dreaming will not get your wishes fulfilled. As we grew into adults, we forgot the magic of life. Our lives became robotic and there was no place for dreams and miracles. To unlock the treasures of life, first we must reactivate the magic of life, the magic of dreams. It’s time that you forget about your limitations and dream again like a child. Get yourself a paper and pen and jot down all your desires.


Divide your life into sections – Profession, Health, Relationships, Material requirements, etc. Write down each and every detail about how you would like your life to be under those sections. The kind of job, your paycheck, your workplace, your colleagues, your employer, your customers or if you want to start a business, your employees, etc. And, about your health or physical state – Is there any illness which you want to heal from, do you want to lose/gain weight, increase the length of your hair, change eye colour…anything. Do you want to heal the damaged relationships with your loved ones? Just write down your entire life the way you want it to be. 

Write down every detail you can think about. Write it this way – Wouldn’t it be good if I had……………… or Wouldn’t it be fantastic if I was………………… Once you are done with your (long!) list, it’s time to change the dimensions. Convert each sentence from ‘If I had………….’ to ‘Thank You very much that I have………….’

For example – ‘Thank you very much that I have a beautiful house’ or ‘I am grateful that my height has increased’ or even ‘I feel thankful that my relation with my friend has healed and we are happy again with each other’ By writing down all this, you are subconsciously telling your mind that all of this has already happened and you are grateful about it. The concept of Gratitude is very deep with respect to Law of Attraction. I will put up a complete post only about gratitude next.

Now that you are done changing all the sentences, read the all over. Read them with full feelings. As you read the, you will have to visualize each of them to be true at This Very Moment. That will create excitement in your body, might even give goose flesh out of pleasure. Feel that emotion completely. Give Thanks again if you feel like as if all your desires are fulfilled. If you are having a problem feeling those emotions, just visualize your goals to have manifested and you are enjoying them. 
Remember, visualize in both 1st person and 3rd person. If your desire was a house, start with closing your eyes and mentally imagine that you have opened the entrance doors of it. Walk inside and look at the lavish furniture and rich chandelier dangling from the ornately decorated ceiling. Feel the smell of Rose perfume wafting through the corridors as you walk through them, listen to the sounds of your family member’s merrymaking at the huge dinner table. Feel the taste of your favourite dish made by your chef as you eat and chat with your family. All of this imagination will surely give you vibrations of pleasure and excitement. Those feelings are the key for manifestations. It is those feelings which turbo-charge your visualization and bring all the happiness in the world for you. Don’t contemplate upon how it will come true. That’s not your job. You just have to act as if you have received all the happiness in the world. The moment you worry about ‘how’ it will happen, you are giving the vibrations of ‘not having’ your desires. This will create resistance. It is your job to feel good. As I said earlier, our feelings are our biggest blessings. We humans are the only creatures who can consciously decide how we want to feel. By feeling the way, we want to feel (even faking the feeling will also work!), we can send positive vibrations from our body which will return as positive things and positive experiences.

After visualizing your dream, just simply feel good and get on with life. Now that you have given to the universe the list of what you want, its your job to feel as if you have received all of your dreams. Make it a point to remind yourself every time that you MUST STAY HAPPY every moment. I know that its difficult as our mood is influenced by many factors. But at least, we can ensure that we stay happy and excited for most of the time. When you start becoming more and more enthusiastic and joyful for small things such as, a tasty cup of coffee, a very good joke from your colleague, a smile from your daughter, a lick from your dog, you are attracting more of those happy moments. Slowly, your days will get better and you would be able to stay happy for longer times. That state of mind will bring all of your desires into your life. 

Monday 24 December 2018

How to Melt Wax for your Craft Projects...?

Either be it candles or wax sculptures, wax must be melted. But, this task can sometimes be dangerous if not done correctly. Wax never must be directly exposed to flame. Watch this video to learn how to melt wax safely - 

Sunday 23 December 2018

How to Paint a Cherry Blossom Bonsai Pot


I found this amazing bonsai pot in the terracotta shop recently. This pot was perfect for my Jade plant Bonsai. But it was dull and boring. So I decided to spice it up. This shade of baby pink and cute cherry blossoms will definitely give it fresh look.


Saturday 22 December 2018

Use Meditation to Reprogram your Mind for Manifestations #102


Think of the mind as a road and thoughts as vehicles. Most of the time, this road has a traffic jam. Many thoughts flood our mind often that we get exhausted trying to attend all of them. The best way to calm down the mind is to meditate.


As a LoA beginner or as a person having difficulty trying to manifest, meditation is a good place to start. Meditation slows down the traffic of thoughts and enhances the brain’s concentration power. This means that you will have more control over your mind and you will be able to consciously decide on what thoughts you want to put your energy into. Meditation also helps you to lower the risk of getting irritated, depressed or angered. 

When I say Meditation, it does not mean hours and hours of sitting silently and concentrating. Every meditator in the world started with 3-5 min per day. And, no one was ever successful in blocking the thoughts even after weeks of practice. Meditation is an art and it requires some time to master this art. You just need to sit down for 5 minutes per day and focus on breathing. Let the thoughts come and go. Don’t resist them nor get carried away by them. If you get distracted, just simply come back to breathing. Slowly, your distractions will reduce. This is a sign that the mind is getting calm day by day. Meditation makes Law of Attraction a breeze to use. I would recommend using an app for beginners called ‘Head Space’ in Play Store. This app is great as you can put on your earphones and instructions will be passed on to you as you meditate.

Thursday 20 December 2018

A Scientific Introduction to Law of Attraction #101


Craft was never only about hand-made works or painting techniques for me. Whenever you create something, it was Craft. It is this Craft which gives Human Beings a special place in our world – the creature who can create. So, let’s get into the depths of Craft and understand the art of creating life. Let’s master the creative technique to live! This post and its successors will bring money, health, love, happiness and all the things you ever desired for into your life easily. 

This is the starting of a brand-new series of posts in this blog. Law of Attraction Simplified into a series of steps. Allow me to seamlessly weave the power of positive thinking into our lives and make it a way of living. In this blog, I shall explain all I know about Law of Attraction, Meditation and Positive thinking. Let’s start with the introduction to Law of Attraction through the eyes of Quantum Science in a very simply way.

We know the universe is made of Space, Time and Energy. Matter, which is nothing but a bundle of atoms, also is Energy. When thought about it in atomic level, Atoms consists of electrons, protons and neutrons. These are noting but packets of energy, right? That simply says that everything in this universe is based on energy. When we talk about energy, we talk in terms of vibrations and frequencies. Vibrations is way energy transmits or communicates. Frequency is the measure of the intensity of vibrations.

 “If you want to find the secrets of the universe, think in terms of energy, frequency and vibration.” – Nikola Tesla

We all work under a law – The Law of Attraction. It is almost as same as Gravitational Law. The only difference is that LoA is in terms of vibrations and is much more powerful that Gravitational Force. LoA says that ‘Like Attracts Like’. Like thoughts attract more such Like thoughts. Like feelings attract more Like feelings. Like Actions attract more such like actions. You might have encountered situations where, you think of a happy memory and many more happy memories just cling to it. Or, you might have felt depressed about something and you start remembering more bad things which worsen your situation. It is LoA working.

A thought is a network of neurons getting connected in our brain. A lot of electric activity happens among these millions of neurons which generate a thought. Each thought has a unique network. The Energy in these thoughts are radiated from our brain. These Vibrations have frequencies. The Frequency of any thought is depended upon the feeling associated with it. A thought with happy feeling has a powerful positive frequency. A thought with depressed emotion has a powerful negative frequency. So, depending upon the intensity of the thought in your brain, you are manifesting your life. The thoughts you have in your brain are sending powerful vibrations each and every moment of your life which in turn are creating your life. 
Your thoughts become things!

Law of Attraction can be as simple as this. So, you might be thinking, “I have a horrible life. I couldn’t have possibly thought all of that.” Well, the truth is that – Yes, you did attract all of that. But, Unconsciously.

Research shows that we have Thousands of thoughts every day. It is impossible to remember each and every thought or feeling we had. But, all of them have an impact over your life. Our thoughts can create our feelings and our feelings can create our thoughts. It is impossible to feel good and have negative thoughts or have happy thoughts and feel depressed. All our feelings throughout the day create many thoughts subconsciously of which we are not consciously aware of. These thoughts have the power to bring the same type of feelings, thoughts and situations back into our life.
You may have not noticed when you had an argument with someone and remained grumpy throughout the day, it just seems to get worse. You encounter more irritating situations into your day one after the other and at night, you wonder what a bad day you had! It is the law of attraction working. You may have heard a good news early in the morning and you just stay blissful. Many more happy things, people, situations and experiences just come one after the other. That’s again LoA. Your present state of mind is creating the future state of mind. All you need to understand is how to change your present state of mind so that you can create the future of your dreams.

It is actually a exhausting work to monitor all your thoughts throughout your life consciously. An easy way is to control your emotions as they have an unbreakable bond with your thoughts. Feel good throughout your day. Force the positive feelings like happiness, ecstasy, excitement, bliss, cheerfulness, joy, pleasure to flood into you. The coming posts will serve as a step-by-step instruction on how you can use LoA to attract abundance, prosperity, happiness, health and love into your life.

Saturday 15 December 2018

How to Paint a Pot as Sparrow | Matka Decoration with Clay

Hello Guys,

 Welcome Back to DIY Craftopedia. This Tutorial is about the most loved content of my Channel - Pot Decoration with Clay.....That too like a bird. This time, I thought about transforming a simple pot into a sparrow shaped artwork. Hope you like this idea.


Materials used - 
- Terracotta Pot
- Air dry clay (you can use Shilpkar/ White M-seal as well)
- Acrylic Paints

Procedure - 

  1. Mould the Clay into a Sparrow head using Balls and coils of clay.
  2. Make the wings using Tear-Shaped ball and them flatten it. 
  3. Attach all the Parts and smoothen the surfaces using water.


Paint the pot first with white acrylic coat.


Then use different shades of brown and cream colour to paint your sparrow. 


Here is a video describing the procedure - 


Sunday 9 December 2018

Growing Mango Plant from Seed | Update 4 | 6 Months Old Tree

Sorry people!

I 'm really sorry for being lost for a some time.....ok ok ....not some time...its been almost 4 months since my last post. But guys, I have a valid reason. I just got admitted into my college and I had to settle in. But I promise from now on, weekly posts will be uploaded for sure!

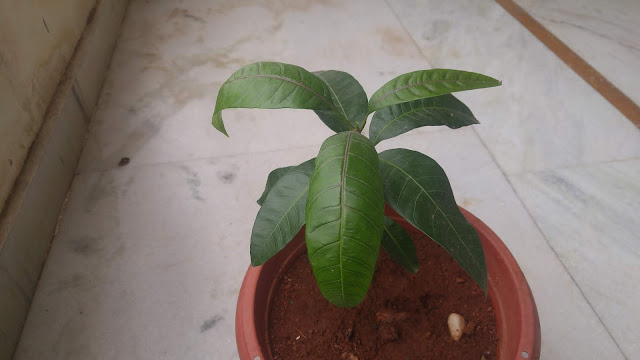
So, now that I'm back to Home for Christmas, my mango plant is no longer a plant. It's a mini Tree!
Mom was taking really good care of it. Everyday, it was watered with the water saved from washing rice, pulses and veggies. It proved really nutritious, and here are the results.

Photos taken on 10th December 2018


I think that this plant is ready for grafting. To stay updated about my first Mango plant growing experience, follow my blog.

Saturday 14 July 2018

How to make a Handmade Paper Bag | Textured Paper Origami


Hello People, Welcome back to my Blog.

Plastics are a Boon and a Bane. Usage of plastic bags are on high because of their cheap availability. But they aren't easily discarded. Hence, the usage of paper bags is a good alternative. The best part is, they are super attractive than simple plastic bags and your can customize them to match your taste and personality.
Origami Paper Bag


Materials Required - - Textured Chart Sheet (if you don't find one, you can use any thick chart paper) - Jute Thread (1.5 meters long) - Hot Glue Gun (Or any good Glue) - Card board sheet (of thickness 0.5 cm to 1 cm) - Scissors - Ruler/Scale - A sharp object (Compass/Divider/empty pen..etc) - Cello Tape
- Stapler
Procedural Video -

Wednesday 11 July 2018

Fashion Illustration | Orange Ball Gown | Watercolor Pencils Art

Hello people, Welcome to DIY Craftopedia
Here is another fashion illustration idea.


Materials -

- Watercolour Pencils. (You can buy them here from Amazon - https://amzn.to/2tQy7iQ ) - Flat Brush. - Round Brush. - Black and Silver Sparkler Pens.

Sunday 8 July 2018

Graphite Pencil Sketching | Landscape Level 2 | Lake Scene


Hello People, Welcome to DIY Craftopedia

Pencil Shading or Rendering is a very useful art. Sketching is done for designing, engineering, architecture and many more.

 Basic Sketching Materials - 

  • Camlin Drawing Pencils HB, 2B, 3B, 4B, 6B and 8B  (You can buy them here from Amazon - https://amzn.to/2Kl7Wfr )
  • Scale 
  • Eraser
  • Sharpener
  • Quality Drawing Paper
View the Video for some basic understanding on Drawing a Simple Lake Scene

Saturday 7 July 2018

Fashion Illustration | Black & White Sparkling Dress

Hello People. Welcome to DIY Craftopedia
Special welcome to my 100th post! This post has to be special. Hence, this is my first fashion illustration related post. Hope you like the design.

Tried my first fashion attempt. Of course a few improvements needed. But, a good attempt....I feel!

Done using Staedlar's Watercolor Pencils.

Who says Black or Grey are dull colors?
Presenting Glittering Black and White long dress design by DIY Craftopedia.


Materials -

- Watercolour Pencils. (You can buy them here from Amazon - https://amzn.to/2tQy7iQ )
- Flat Brush. - Round Brush. - Black and Silver Sparkler Pens.


Friday 6 July 2018

Pencil Shading Basics | Landscape Level 1 | Trees


Hello People, Welcome to DIY Craftopedia

Pencil Shading or Rendering is a very useful art. Sketching is done for designing, engineering, architecture and many more.

 Basic Sketching Materials - 

  • Camlin Drawing Pencils HB, 2B, 3B, 4B, 6B and 8B  (You can buy them here from Amazon - https://amzn.to/2Kl7Wfr )
  • Scale 
  • Eraser
  • Sharpener
  • Quality Drawing Paper
View the Video for some basic understanding on Drawing a Simple Tree

Wednesday 4 July 2018

Growing Mango Tree from Seed | Update 3 | Week 3

Hello People, Welcome to DIY Craftopedia!

Back to the 3rd update on my Mango Sapling. The days are becoming really hot. It is slightly sunny and humid. The plant seems to love it! The leaves have turned saturated green. New leaves are coming up. Here are the pics taken on 04-07-18.


You can see the new upcoming leaves here -

Monday 2 July 2018

Make a Stunning Vase with Plaster of Paris and an Old Piece of Cloth


Truly, Plaster of Paris is a wonder material. Let's see what exactly it is -

Plaster is a building material used for the protective and/or decorative coating of walls and ceilings and for moulding and casting decorative elements. In English "plaster" usually means a material used for the interiors of buildings, while "render" commonly refers to external applications. Another imprecise term used for the material is stucco, which is also often used for plaster work that is worked in some way to produce relief decoration, rather than flat surfaces.
The most common types of plaster mainly contain either gypsum, lime, or cement, but all work in a similar way. The plaster is manufactured as a dry powder and is mixed with water to form a stiff but workable paste immediately before it is applied to the surface. The reaction with water liberates heat through crystallization and the hydrated plaster then hardens.
Plaster can be relatively easily worked with metal tools or even sandpaper, and can be moulded, either on site or to make pre-formed sections in advance, which are put in place with adhesive. Plaster is not a strong material; it is suitable for finishing, rather than load-bearing, and when thickly applied for decoration may require a hidden supporting framework, usually in metal.
Gypsum plaster, or plaster of Paris, is produced by heating gypsum to about 300 °F (150 °C).
CaSO4·2H2O + heat  CaSO4·0.5H2O + 1.5H2O


Procedure - 

  1. Mix Plaster Powder with water until you get a thick liquid consistency.
  2. Take a square shaped cloth (Of any material, my favorite choice is jute rag as it gives fantastic texture)
  3. Dip the cloth in plaster and completely soak it with the mixture.
  4. Take a tumbler/bottle and cover it with a plastic sheet.
  5. Invert it and put the cloth on it as shown - 
    

      6. Let it dry for 24 hrs 
      7. Remove the hardened vase and paint it with Acrylic/Enamel paints.


Wednesday 27 June 2018

Growing Mango Tree from Seed in a Pot | Week 2 | Update 2

Hello People, Welcome to DIY Craftopedia

This is the 2nd update of my Mango Sapling. Nowadays its not so sunny here. Today was really cloudy but the heat persisted. The present atmospheric conditions here are: Temperature - 26 degree Celsius and 83% humidity. It is expected to rain in some parts of Hyderabad. I do wish it rains. Rain water has magical effects on new born saplings! It's true. I have tested it out that transplanted plants and newly sprouted plants love rain water.

Coming back to my Mango Sapling, It unfurled 3 new leaves which are still reddish brown. The size of one leaf is really good. The others are yet to increase. The remaining old leaves have turned really thick with highly saturated green color. I'm still continuing the water used for washing vegetable peels and food grains to water the plant. Otherwise, no extra fertilizer is used. Every morning, I place the plant in direct Sunlight (Whichever day, sunlight is available!).

Here are the pictures of my Mango Plant taken on 27-06-2018 (Wednesday)


A new bud is growing. Maybe it will produce more branches. Let's wait. To stay updated about my first Mango plant growing experience, follow my blog.

Tuesday 26 June 2018

How to Make a Layered Gel Wax Candle | Designer Gel Candle Making Tutorial

Hello people. WELCOME to DIY Craftopedia

My last post on Gel wax fetched a lot of popularity by you folks. Hence, I decided that another Gel Candle idea would be appreciated by you. This one is really special and slightly tricky. Gel Wax is jelly. It bends like a thick sponge cloth. Hence, it is perfect for this idea. Materials required -
- Gel Wax (You can buy at amazon - https://amzn.to/2HUsftN ) - Gel Wax colours (You can buy at amazon - https://amzn.to/2t1vjzU ) - Candle Wick - Double Boiler setup - A clean plate or tray - Spoon/Spatula - Big Needle/Thin stick
- Cutter/Knife - Scissors.

Procedure - 
  1. Melt some gel wax in a double boiler.
  2. Add your favorite colour to it.
  3. Carefully, pour the molten gel wax in a plate/tray upto 1/4th inch thickness.
  4. Keep it away to cool down. Meanwhile repeat the procedure with another colour.
  5. After the layer of gel wax cools down, cut strips of almost 3cm thickness.
  6. Take two strips of different colors and put them end-to-end on each other at 90 degree angle as shown - 
  7. Lift the bottom strip and fold it along the edge of the top strip towards the opposite side. Repeat the process throughout the strip as shown -
  8. Once the entire two strips are folded like that, Pierce a small hole through the candle from top to bottom.
  9. Attach the wick to the needle and use it to send through the candle.
  10. Cut-off any extra wick at the top. Your Designer Gel wax candle is done!


Procedural Video - 


(The above amazon links are affiliate. When you use them, I receive a small commission for no extra cost to you)

Saturday 23 June 2018

Make a Textured Bowl for your Table Top with Plaster of Paris


Making a Plaster of Paris Bowl

Hello Guys, Welcome to DIY Craftopedia!
This is the first time I'm working with Plaster of Paris. It was fun and most importantly, It was economical. The kind of products which we can make with POP is a lot costlier in the shop than the POP packet itself. I have made a Wood Textured Bowl with it.

Materials needed -
- POP (Gypsum Powder) - Two bowls of the same shape but different size - Any old container to mix POP - Crushed plastic sheet. - Water - Spoon to mix. - Newspaper and gloves.

Procedure -

  • Mix POP powder and water appropriately until you get a thick consistency.
  • Cover the inner surface of bigger bowl with plastic sheet;
  • Pour the mixture into the big bowl.
  • Press the smaller bowl into the POP mixture.
  • Put some heavy stones in the smaller bowl to hold it in place.
  • Leave it to dry overnight.
  • Remove the smaller bowl and slowly remove the plastic sheet as well.
  • Paint the bowl with acrylic/enamel paints.


Procedural Video - 

Wednesday 20 June 2018

Growing Mango Tree from Seed in a Pot | Update 1

Hello People, Welcome back to DIY Craftopedia.

It's almost 1 week since my last (and the first) Mango plant post. The plant is nearly 3 weeks old. Its growing really healthy. The days are still sunny. The plant is receiving early morning direct sun rays and indirect rays throughout the day. The major update is that the leaves have turned Green completely today(21-06-2018). New major shoots are coming. The overall plant growth is commendable. I'm not yet giving any fertilizers. Almost every day, I use the water used for washing rice grains to water the plant. This technique was proved effective by me for many other plants and I think this is the reason for its healthy look. I would recommend you, not to use any chemical fertilizers as they might burn the sapling. Use the water used for washing food grains and vegetables/fruits to water the plant on regular basis.

Here are the pictures of my Mango plant taken on 21-06-2018


Here you can see the new shoots coming - 


This is the first update of my Mango Plant Growth done on 21-06-2018. Stay tuned for real-time update of its growth every week.


Sunday 17 June 2018

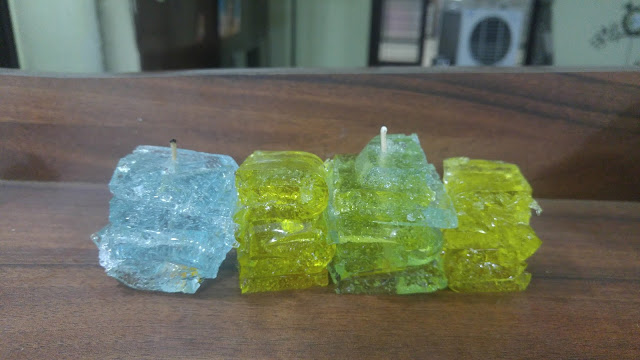
Crystal Gel Wax Candle | Easy No Heat Required Candle Making


Hello people, Welcome to DIY Craftopedia. Candle making was always one of my favorite Craft Works. Hence, trying out new methods is always exciting. This time, I'm making a Gel Wax Candle.
Melting wax is a difficult job. Especially if you don't have a double boiler.
This chore makes candle making unpopular craft. But, not anymore. This technique is very simple as you won't require any heat.


A small intro about Gel Wax -

Gel wax is a mixture of polymer and mineral oils. As, the name suggests - it is squishy and jelly. Usually, you get transparent material when you buy it. Colors used for it are sold separately. Here are the links for you to buy them from Amazon -

Asian Hobby Crafts Gel wax (500gm) - https://amzn.to/2t1vjzU

Asian Hobby Crafts Gel Wax colours - https://amzn.to/2HUsftN

Other Materials Required - - Glass Tumbler - Candle Wick - Gloves - A Bowl to mix Gel Wax.

Procedure - 

  1. Cut a few pieces of gel wax and put them in a container.
  2. Put on a pair of gloves and start crushing the gel wax pieces with your hands.
  3. Crush them into almost same size.
  4. Add few drops of your favorite colour to it and mix again.
  5. Take a glass tumbler/container and some crushed gel wax in it. (Add until the height to which you can put the wick.
  6. Hold the wick at the middle of the container and add the remaining gel wax in it.
  7. Ensure that the wick stays at the middle and press down the gel wax.
  8. Add a bit more of colour if required and adjust the wick height. 


Procedural Video - 


The above Amazon links are affiliate. I receive a small commission when you use them with no extra cost to you.

Saturday 16 June 2018

Learn Pot Painting using M-Seal - Lilac Flower Decoration

Pot Painting using M-Seal - Lilac Flower Decoration


Hello people, welcome back to DIY Craftopedia. I recently looted a terracotta shop (yep...!) and bought a ton of pots for an extremely cheap price. So, this summer, it will be a terracotta fest in my channel.

Materials used-

- Terracotta Pot
- Shilpkar (White M-Seal) - Enamel Paint (Brown) - Hair Dye Brush (for Enamel Paint) - Acrylic paints ( Metallic Pink and Violet colors) - Synthetic Brushes (for Acrylic Paints) - Gloves and Newspaper (to avoid a mess)


Procedural Video -

The finished work - 


How to make Trees for Dioramas | Artificial Trees for Architectural Mode...

Hello Craftopedians! Wire Trees Wire Trees made of Wool As the Title suggests, this is an Architecture Student Hack video...